Keeping your WordPress site updated is crucial for maintaining health and running smoothly. While updating your site may seem complicated, proper preparation can make it easy. This blog will provide a step-by-step guide to help you keep your WordPress site up to date.
Step 1: Back Up Your Website
Think of this step as creating a safety net for your website. Before you do anything, you must ensure you have a complete copy of your website's files and database. This way, you can quickly bounce back if anything goes wrong during the update.
How to Do It:
One of the easiest ways to back up your site is using a plugin called UpdraftPlus. Install UpdraftPlus, hit the backup button, and it'll save a copy of your entire site. You can store this backup on your computer, in the cloud, or even send it to your email for safekeeping.
Step 2: Head to the Updates
The WordPress dashboard is your control center. Here, you'll find everything you need to update your site.
How to Do It:
Log in to your WordPress dashboard, and look for the “Updates” section. It's usually highlighted if updates are available, so it's hard to miss. Click on it to see if WordPress or any of your plugins or themes need updating.
Step 3: Update WordPress and Plugins
You'll give your site the latest features and security fixes it needs to stay healthy.
How to Do It:
On the Updates page, you'll see an option to update WordPress to the latest version. Go ahead and click that update button. After WordPress is updated, it's time to update your plugins. Before you hit update, ensure the plugins are compatible with the new version of WordPress you just installed. Most of the time, plugin authors will indicate compatibility on the plugin page.
Step 4: Check Your Site
It's essential to check that everything works properly after updating.
How to Do It:
Visit your website as if you're a visitor. Click around, check out different pages, and ensure everything loads correctly and functions as it should. Pay special attention to the features provided by the plugins you've updated. If anything looks off, don't panic. That's why you have your backup.
Step 5: Restore If Needed
If your website experiences any issues after the updates, it's time to use the safety measures you prepared earlier.
How to Do It:
Head back to UpdraftPlus and use the restore option. Select the backup you created before starting the update process, and let UpdraftPlus do its thing. It'll bring your site back to exactly how it was before you began to update. Once restored, you can figure out what went wrong or contact a professional for help.
Check out our YouTube channel for a quick and easy guide to upgrading your WordPress site!
Ready to Create Your Website?
If you’re inspired to start or upgrade your website, we’re here to help. Check out our website for more deals and a Free Website Setup to get you rolling. Plus, if you’re considering premium web hosting, we’ve got an incredible offer for you.
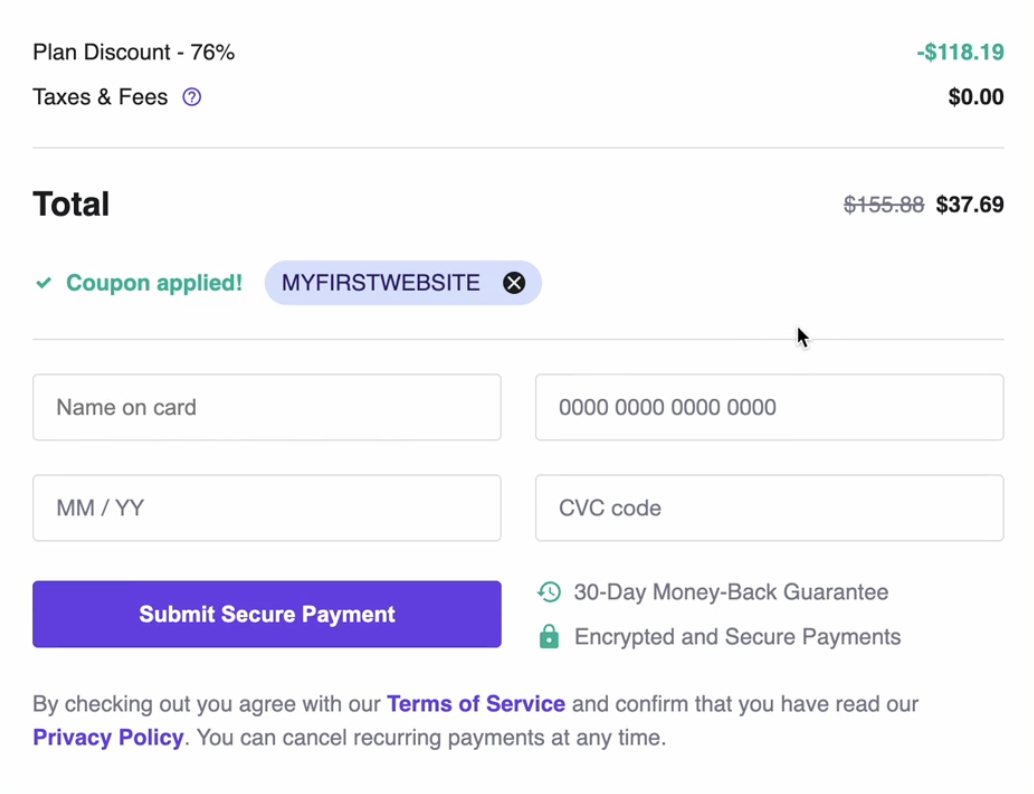
Get a HUGE Deal using our coupon code ‘MYFIRSTWEBSITE’ for a 12-month Premium Web Hosting Plan with Hostinger. This deal makes starting your website more affordable and ensures you have the reliable, fast hosting needed to keep your site running smoothly.