AI website builders like CodeDesign AI make it easy to create a website in minutes, even if you don’t know how to code. But what if you want more control? Maybe you want to fine-tune the design, add a custom feature, or make sure your site works exactly the way you want. That’s where exporting and editing your code comes in.
In this guide, I’ll walk you through how to export code from CodeDesign AI, how to edit it for full customization, and tips to make the process smooth, even if you’re not a professional developer.
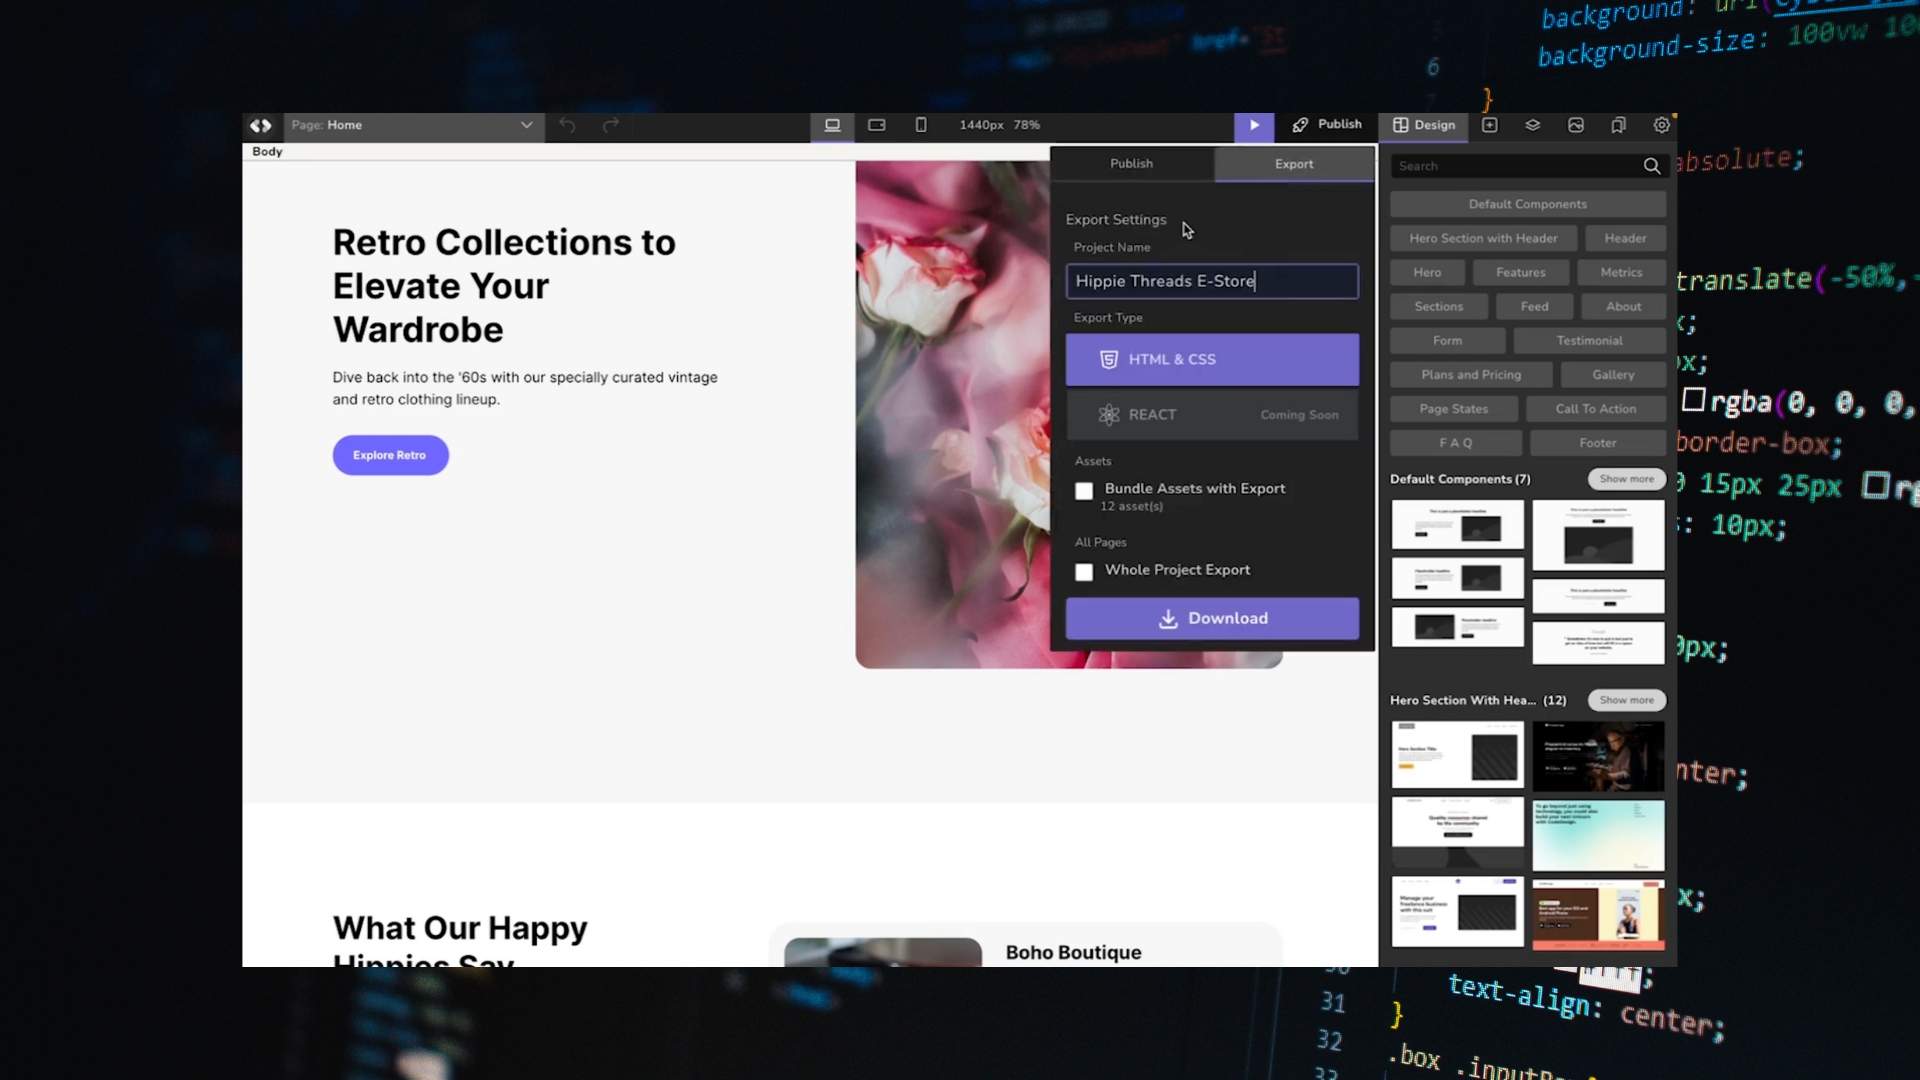
Why Export Code from CodeDesign AI?
When you use CodeDesign AI, most of the heavy lifting is done for you. It generates a full website based on your inputs. But exporting the code gives you more freedom. You can:
- Add custom scripts or features that the AI doesn’t support.
- Fine-tune the design beyond the available templates.
- Move your site to a different hosting provider.
- Make your website more scalable as your business grows.
If you want complete ownership of your site, exporting is the way to go.
If you haven’t tried CodeDesign AI yet, now’s the time. It’s one of the fastest ways to build a professional site without hiring a developer, and exporting your code gives you the freedom to grow beyond the platform when you’re ready.
Step 1: Exporting Your Code
Exporting your site from CodeDesign AI is straightforward.
- Log into your account on CodeDesign AI.
- Open the project you want to export.
- Look for the Export Code option. This usually lets you download the full HTML, CSS, and JavaScript files.
- Save the zip file to your computer.
Once downloaded, you’ll have a folder with everything your website needs:
- HTML files for each page.
- CSS files that control design and layout.
- JavaScript files that add functionality.
- Assets folder with images, icons, and fonts.
Step 2: Setting Up Your Code Editor
To edit the exported files, you’ll need a code editor. A few popular free options are:
- Visual Studio Code (VS Code) – Great for beginners and advanced users.
- Sublime Text – Lightweight and simple.
- Atom – Easy to use with lots of plugins.
Download and install one of these, then open your exported project folder inside the editor. You’ll see the file structure laid out so you can start making changes.
Step 3: Editing Your Website Files
Now the fun part, customizing your site.
- HTML: Controls your website’s structure. You can edit text, add new sections, or remove blocks you don’t need.
- CSS: Handles your site’s look. Change fonts, colors, spacing, and layout. For example, if you want all your buttons to be blue instead of green, you’ll edit the CSS file.
- JavaScript: Manages interactions like sliders, pop-ups, or animations. You can add new scripts here or tweak the existing ones.
If you’re new to coding, start with small edits in the HTML and CSS files. Even minor changes can make your site feel unique.
Step 4: Testing Your Changes
After editing, you’ll want to make sure your site still works properly.
- Open the HTML file in your browser to preview it.
- Check that your design changes look right and everything loads correctly.
- Test interactive elements like buttons, forms, or sliders.
If something breaks, don’t panic. Most issues come from missing brackets or typos. Your editor will usually highlight errors so you can fix them quickly.
Step 5: Hosting Your Customized Website
Once you’re happy with your changes, it’s time to put your site online. You can use hosting providers like:
- Hostinger – Affordable and beginner-friendly.
- Bluehost – Great for WordPress and small businesses.
Upload your project folder to your hosting platform, and your site will be live with all your custom edits.
Tips for Smooth Customization
- Keep a backup: Always save the original exported files before making edits.
- Use comments: Add notes in your code so you remember what changes you made.
- Learn step by step: If you’re new to coding, focus on small edits at first and grow your skills over time.
- Use browser dev tools: Right-click on your site in the browser and choose “Inspect” to test edits before changing the code.
Final Thoughts
CodeDesign AI makes building a site easy, but exporting the code gives you full control. You can customize the look, add advanced features, and truly make the website your own. Even if you’re not an expert in coding, small tweaks in HTML and CSS can go a long way.
Run your first export, open the files in a code editor, and start experimenting. The more you practice, the more confident you’ll get in customizing your site.